
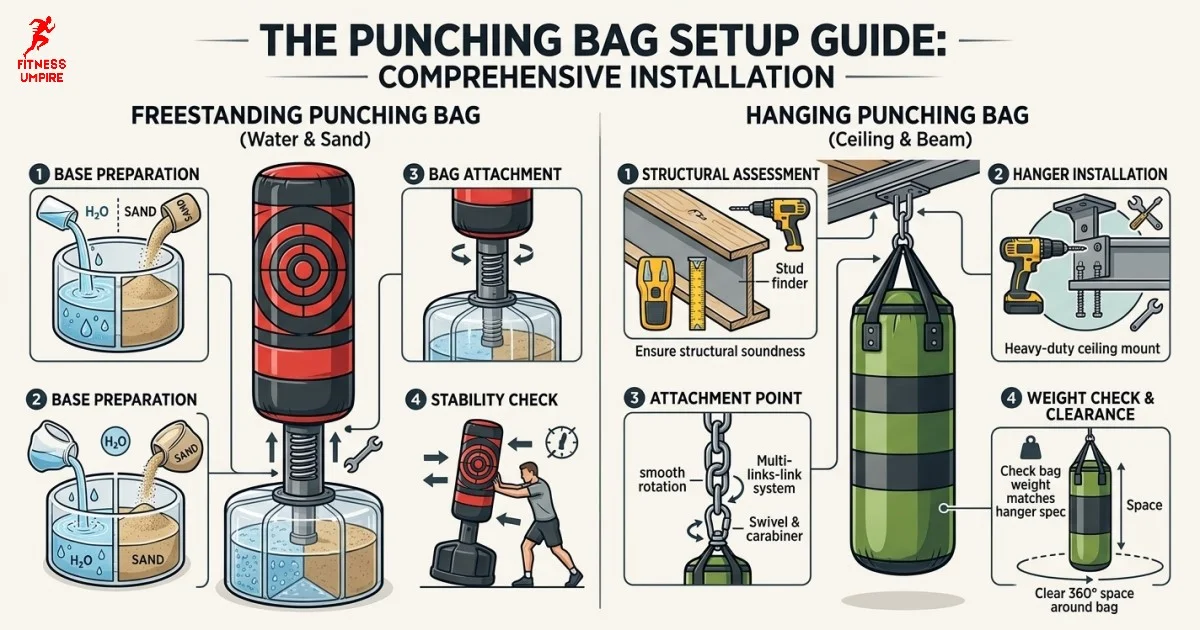
Setting up a punching bag depends mainly on the type you have. A freestanding punching bag needs a properly filled and stable base, while a hanging punching bag needs a secure mounting point capable of handling repeated impact.
For a freestanding bag, the basic process is to assemble the bag, fill the base with water or sand, place it on a suitable surface, and test its stability. For a hanging bag, the process involves choosing a structural mounting point, installing appropriate hardware, attaching the bag, and checking the entire setup before use.
The two setups are very different in effort: a freestanding bag is generally simpler because it does not require permanent installation, while a hanging bag requires more planning and secure mounting.
How to Set Up a Freestanding Punching Bag
Freestanding punching bags typically consist of an upright striking section connected to a wide base. The base provides the weight needed to keep the bag in position when it is punched or kicked.
1. Assemble the Bag
Start by following the assembly instructions supplied with your particular punching bag. Depending on the model, this may involve attaching the bag section to a spring, shaft, collar, or base.
Before filling the base, make sure all connections are properly seated and tightened. The bag should stand upright without leaning.
Do not assume that every freestanding bag is assembled the same way. Base design, attachment points, and filling instructions vary between models.
2. Choose the Right Location
Place the bag on a flat, solid surface with enough open space around it.
A garage floor, home gym floor, basement floor, or other sturdy level surface can work when the environment is appropriate for the particular bag.
Leave enough room for you to move around the bag without hitting walls, furniture, doors, or other objects. Remember that the bag can move during harder punches and kicks.
A protective floor mat can also help reduce movement and protect the floor, depending on the surface and bag design.
3. Fill the Base With Water or Sand
Most fillable freestanding punching-bag bases use either water or sand. Follow the manufacturer’s instructions first because the recommended filling method can differ between models.
Water is usually easier to add and remove. This can be convenient if you need to move the bag frequently.
Sand provides a different filling option and is commonly used when a heavier, more permanent-feeling base is desired. However, filling and emptying a sand-filled base can be considerably more inconvenient.
Do not mix materials or exceed the manufacturer’s recommended fill level unless the manufacturer specifically permits it.
For a detailed comparison of the two options, see the water vs. sand punching bag base comparison.
4. Check the Base for Stability
After filling the base, stand back and inspect the bag.
Check that:
- The base sits flat on the floor.
- The bag stands upright.
- The base does not rock excessively.
- Connections between the bag and base are secure.
- There is enough clearance around the bag.
- The bag does not move into an unsafe area during normal practice.
Give the bag a few controlled punches before beginning a harder workout. Watch how the base responds and whether the bag returns to its normal position.
If the bag shifts excessively, stop and identify the cause rather than simply hitting harder.
5. Test the Setup Gradually
Start with light punches and controlled movements. Gradually increase the force while watching the base and connections.
A properly positioned bag can still move during training. Movement itself is not necessarily a problem; excessive sliding, rocking, tipping, or unexpected movement indicates that the setup needs attention.
How to Set Up a Hanging Punching Bag
A hanging punching bag requires a different approach because the bag’s weight and the force generated during training are transferred through the mounting system.
The most important part is the supporting structure, not simply the hook or bracket.
A suitable mounting location must be strong enough for the bag and the repeated dynamic forces created during training. A decorative ceiling feature, weak attachment point, or unsuitable piece of hardware should not be treated as a structural mounting point.
Before installation, determine where the bag will hang, how much clearance you need, and what type of mounting system is appropriate for the structure.
For the complete installation process, see our punching bag mounting guide.
Hanging Bag Setup Checklist
Before using a newly mounted bag, check:
- The mounting point is structurally suitable.
- The mounting hardware is appropriate for the installation.
- All connections are secure.
- The bag hangs correctly.
- The chain, straps, swivel, or other connecting components are properly attached.
- There is sufficient space around the bag.
- The bag does not contact nearby walls or objects during normal movement.
If you are unsure whether a particular ceiling, beam, wall, or mounting point can safely support the bag, do not rely on appearance alone. Consult the manufacturer’s installation requirements or a qualified professional familiar with the structure.
Freestanding vs. Hanging Punching Bag Setup
The setup effort is one of the biggest practical differences between the two types.
| Setup factor | Freestanding bag | Hanging bag |
|---|---|---|
| Main requirement | Stable weighted base | Secure structural mounting point |
| Assembly | Usually straightforward | Requires installation |
| Filling | Water or sand, depending on model | Not applicable |
| Permanent installation | Usually unnecessary | Usually required |
| Moving the bag | Generally easier | More difficult |
| Planning required | Relatively low | Higher |
| Floor space | Requires substantial floor area | Requires clear space around the hanging bag |
| Main setup concern | Base stability | Mounting security |
A freestanding bag is generally the simpler choice when you want to assemble the equipment without modifying a ceiling or structural support. Its main setup task is getting the base properly filled and stable.
A hanging bag can provide a different training setup, but installation requires considerably more attention to the supporting structure and mounting hardware.
Neither setup should be treated as completely maintenance-free. Periodically inspect the base, mounting hardware, attachment points, and surrounding area for signs of loosening or damage.
Common Punching Bag Setup Mistakes
Using an unsuitable surface
An uneven or unstable surface can make a freestanding bag move more than expected. Start with a level, sturdy surface.
Underfilling the base
If the manufacturer’s instructions specify a particular fill level, follow them. An inadequately filled base may not provide the intended stability.
Choosing a hanging point based only on convenience
The closest ceiling or wall location is not automatically a suitable mounting point. Structural support should be the first consideration.
Ignoring clearance
A punching bag needs room to move. Placing it too close to walls, furniture, vehicles, or other equipment can create unnecessary problems during training.
Testing at full force immediately
A new setup should be checked progressively. Start with controlled impacts and make sure the bag, base, and connections behave as expected.
Which Punching Bag Setup Is Easier?
For most users, freestanding setup requires less installation work. You assemble the bag, fill the base according to the manufacturer’s instructions, position it, and test its stability.
A hanging bag involves more preparation because the mounting point and supporting structure must be suitable before the bag can be used.
The better setup for a particular room therefore depends on more than the bag itself. Consider the available floor space, whether permanent installation is acceptable, how often the equipment needs to be moved, and what type of training environment you want.
Once the setup is complete, inspect the equipment periodically and address any loose connections, unusual movement, or visible damage before continuing training.
FAQ
Can you fill a freestanding punching bag base with water?
Many freestanding punching bags are designed to be filled with water, but not every model uses the same filling system. Check the manufacturer’s instructions before adding water.
Is sand better than water for a punching bag base?
Water and sand have different practical advantages. Water is generally easier to add and remove, while sand can be less convenient to handle. The correct choice depends on the specific base and how you plan to use and move the bag.
Does a freestanding punching bag need to be attached to the floor?
Typically, freestanding bags are designed to remain in position using their weighted base rather than permanent floor attachment. Always follow the instructions for the specific model.
Can a punching bag be mounted anywhere on a ceiling?
No. The mounting location must be structurally appropriate for the bag and the forces generated during use. A suitable mounting system and supporting structure are essential.
How much space should you leave around a punching bag?
Leave enough open space for the bag and the user’s normal movement without contacting walls, furniture, vehicles, or other obstacles. The exact amount depends on the bag and training environment.
Final Setup Check
Before your first full workout, confirm that the bag is correctly assembled, the freestanding base is properly filled or the hanging system is securely installed, and there is adequate clearance around the equipment.
For a freestanding bag, base stability is the key setup issue. For a hanging bag, the mounting structure and hardware are the key concerns.
Taking a few minutes to check these points can make the difference between a setup that is ready for regular training and one that needs adjustment.